Research, Articles, Design
![[Article] Get to know your lettuce!](http://cityfarm.my/cdn/shop/articles/11_12_1400x.png?v=1635577087)
[Article] Get to know your lettuce!
Lettuce Categories
Cos lettuce

Also known as Romaine lettuce, it is medium to large in size and is believed to be one of the oldest varieties in the world. Its physical characteristics are elongated and stiff, with leaves averaging about 10-15cm in length and having a firm rib that runs down the centre. With red and green varieties, the intensity of the colours is strongest at the tip, displaying a dark red or green colour that fades into a near-white colour at the base of the leaf. The taste and texture of Cos lettuce are described as crisp, succulent, and crunchy with a mildly bitter taste.
Growing
|
Sunlight |
Full/partial sun |
|
Temperature |
<34°C, excess heat can cause bolting |
|
pH |
pH 6.2 - pH 6.8 |
|
Duration |
55 days |
Butterhead lettuce

Also known as Boston or Bibb lettuce, it is a medium sized lettuce. Its physical characteristics are short and attractively rose-like, with leaves averaging to about 10cm in length. With red and green varieties, the intensity of the colours is achievable with strong lighting. Red varieties are a blend of red, purple, and burgundy that slowly fade green at the base, whereas green varieties are intensely coloured that stays consistent from tip to base. The leaves are described as soft, loose, wavy, and wide growing in a rosette fashion, with taste and texture being described as lightly sweet and tender.
Growing
|
Sunlight |
Full/partial sun |
|
Temperature |
<32°C, excess heat can cause bolting or melting |
|
pH |
pH 6.2 - pH 6.8 |
|
Duration |
50 days |
Lolla

Lolla lettuce, also known as coral lettuce, is a medium to large sized lettuce that is one of the most common lettuce seen in stores. Its physical characteristics are that it has extremely dense, soft, and wavy leaf tips, while having firm and fleshy ribs. It comes in red and green varieties, Lolla rossa and Lolla bionda respectively, that are intensely coloured. The taste is mild and texture is described to be smooth, crunchy, and light.
Growing
|
Sunlight |
Full/partial sun |
|
Temperature |
<30°C, excess heat can cause bolting or melting |
|
pH |
pH 6.2 - pH 6.8 |
|
Duration |
55 days |
Oakleaf

Oakleaf lettuce is a type of looseleaf lettuce that does not form a compact head that grows large in size. As the category suggests, its physical characteristic is a loose, bushy bunch that extends out from a narrow base. Its leaves are described to be hook-shaped, tender, broad, and curled that are fragile and tear easily. Oakleaf comes in two colour varieties, red and green, with both colours not being very intense even when exposed to strong lighting. It’s taste is described to be nutty and mildly bitter or sweet depending on the variety.
Growing
|
Sunlight |
Full/partial sun |
|
Temperature |
<30°C, excess heat can cause bolting or melting |
|
pH |
pH 6.2 - pH 6.8 |
|
Duration |
50 days |
Batavia

Batavia is a more heat tolerant lettuce that grows to a medium or large size. Its physical characteristics is a wide, wavy and dense leaf arrangement at the top that stems from a small base. As mentioned, its leaves grow out from the centre point at the bottom, spreading out large and having wavy tips. The intensity of the waves are dependent on the variety. Like other lettuces, Batavia comes in both red and green varieties. Red varieties are usually only red at the tips, with visible transitions to green 2-3cm from the tip. Its taste and texture is described to be earthy and smooth.
Growing
|
Sunlight |
Full/partial sun |
|
Temperature |
<35°C, excess heat can cause bolting or melting |
|
pH |
pH 6.2 - pH 6.8 |
|
Duration |
50 days |
Special Varieties
Salatrio

Salatrio lettuce is not a specific variety of lettuce, but a special combination of three different lettuce varieties in one pot. Rijk Zwaan, one of the industry leaders in vegetable breeding, has specially selected combinations that grow well together. In total, there are 12 different combinations available worldwide.
Eazyleaf

Eazyleaf is a category of lettuce varieties produced by Enza Zaden. The main attraction of these varieties is its ease of preparation. Eazyleaf plants are specially made for a one-cut preparation that will split the vegetable into many, equally sized leaves. These varieties are highly suitable for food processing and commercial use, where automation is common and operations are time sensitive.
Salanova

Salanova is a category of lettuce varieties produced by Rijk Zwaan. Varieties under the Salanova product line are specially produced for use in hydroponic systems, providing better taste, quality, and production. Benefits include 40% more yield, improved taste and texture, and increased shelf life.
Types of Seeds
Unpelleted

Unpelleted seeds are your typical seeds you would buy or collect. These seeds have not been processed after harvest and come in its original shape and for, therefore managing these seeds may be a challenge, especially with machinery.
Pelleted

Pelleted seeds are coated to make them round, smooth, and uniform. This is done so that commercial growers can handle them easier. Certain plants produce very small seeds, and a commercial farmer may find it difficult to manage them at a small size. By coating them, all seeds are equal in size and round. This is especially useful when being used with machinery, such as a mechanical seeder.
- Tan Koon Hong (UCSI University)
![[Research] Effects of Dissolved Oxygen (DO) on the Growth of Lollo Rossa in NFT Hydroponic System](http://cityfarm.my/cdn/shop/articles/11_1400x.png?v=1625561065)
[Research] Effects of Dissolved Oxygen (DO) on the Growth of Lollo Rossa in NFT Hydroponic System
The Effect of Dissolved Oxygen on the Growth of Lollo Rossa in Nutrient Film Technique (NFT) Hydroponic System
Objectives:
- To study the effect of dissolved oxygen on the growth of Lollo Rossa (red coral lettuce).
- To examine the level of dissolved oxygen in nutrient solution with and without aeration system.
Introduction:
Materials:
Methods:


Results:
|
Tank |
Average experimental conditions |
|||
|
EC (mS/cm) |
pH |
DO (mg/L) |
Temperature (℃) |
|
|
Oxygenated |
1.52 |
6.4 |
7.3 |
27.6 |
|
Control |
1.45 |
6.4 |
4.8 |
28.2 |
Table 2.0: Final root and shoot mass of Lollo Rossa samples
|
Sample |
Oxygenated tank |
Control tank |
||
|
Root mass (g) |
Shoot mass (g) |
Root mass (g) |
Shoot mass (g) |
|
|
1 |
27 |
69 |
23 |
67 |
|
2 |
29 |
90 |
24 |
56 |
|
3 |
35 |
114 |
30 |
80 |
|
4 |
32 |
101 |
30 |
90 |
|
5 |
30 |
109 |
29 |
83 |
|
6 |
32 |
118 |
32 |
103 |
|
7 |
34 |
113 |
28 |
80 |
|
8 |
27 |
71 |
28 |
74 |
|
Average mass |
30.8 |
98.1 |
28.0 |
79.1 |
Note: Both root and shoot mass of samples included the net pot and water content in the sponge.
Table 3.0: Independent sample t-test results of the samples’ final root mass
|
Group |
n |
Mean |
SD |
df |
tcal |
t0.05 |
Result |
|
Oxygenated |
8 |
30.75 |
3.012 |
14 |
1.808 |
1.761 |
Accept |
|
Control |
8 |
28.00 |
3.071 |
14 |
Note: The alternative hypothesis specifies that the final root mass of oxygenated group is greater than control group. (Significance level, α = 0.05)
*n = Number of samples; SD = Standard deviation; df = Degree of freedom
Table 4.0: Independent sample t-test results of the samples’ final shoot mass
|
Group |
n |
Mean |
SD |
df |
tcal |
t0.05 |
Result |
|
Oxygenated |
8 |
98.13 |
19.44 |
14 |
2.232 |
1.761 |
Accept |
|
Control |
8 |
79.13 |
14.21 |
14 |
Note: The alternative hypothesis specifies that the final shoot mass of oxygenated group is greater than control group. (Significance level, α = 0.05)
*n = Number of samples; SD = Standard deviation; df = Degree of freedom

Figure 3.0: Final shoot mass and root mass of Lollo Rossa samples.
The (a) shoot and (b) root mass of Lollo Rossa samples collected from oxygenated nutrient tank were greater than (c) shoot and (d) root mass samples from the control.

Figure 4.0: Effect of DO on the growth of Lollo Rossa samples grown in oxygenated and control nutrient tank.
(a) The DO levels in oxygenated nutrient tank (blue line) was practically constant at 7.4 mg/L, whereas the DO levels in control nutrient tank (orange line) remained constant at 4.8 mg/L. The (b) average of plant fresh weight, (c) plant height and (d) leaf number of Lollo Rossa samples grown in oxygenated and control nutrient tank throughout the experimental period.
Notes:
1 The fresh weight of samples has included the net pots and water content in the sponge.
2 The height of samples was measured from the base of net pot up to the tip of leaf.
Discussion:
Dissolved oxygen is simply the presence of free oxygen (O2) molecules dissolved in water and is a critical parameter to be optimized in assessing water quality as it indirectly influences any organisms living by the water. Likewise, in horticulture, DO plays important roles in enhancing both plant quality and crop yields. There are two factors which are temperature and salinity greatly influence the DO content in hydroponic system. Between these two factors, DO content is very temperature-dependent as the temperature inversely regulating the solubility of oxygen in water. Generally speaking, cold water can hold more dissolved oxygen than warm water and vice versa (Becker, 2016).
Based on Table 1.0, although the average temperature of the oxygenated nutrient tank is 0.6 ℃ lower than the control nutrient tank, there is a significant difference in the DO level whereby the oxygenated nutrient tank is 2.5 mg/L higher than the control. Due to the presence of air stones and surface agitation in oxygenated nutrient tank, air bubbles were produced and dispersed evenly in the tank, causing a higher rate of gas exchange at water interface and a higher concentration of DO. In term of the average EC value of nutrient solution, oxygenated nutrient tank demonstrated a higher EC value than the control in the end of the experiment as the plants grown in oxygenated nutrient tank had higher transpiration rate than nutrient uptake rate.
Additionally, based upon Table 2.0, Lollo Rossa samples grown in oxygenated nutrient tank had greater average root and shoot mass in compared with the control. By conducting pooled t-test, the results had revealed that both final root and shoot mass of samples grown in oxygenated nutrient tank were significantly greater than the control samples (Table 3 and Table 4). As proof, Suyantohadi, Kyoren, Hariadi, Purnomo, and Morimoto (2010) also elucidated that DO had positively impacted on both plant and root development in which plants grown in nutrient tank with saturated DO displayed better root and shoot characteristics. Besides, as illustrated in Figure 3.0, samples grown in oxygenated nutrient tank were compact and good in shape. Also, the overall root mass of samples grown in oxygenated nutrient tank was visibly denser and longer than the control samples. Thus, high levels of DO largely not only promote healthy root formation but foster plant development process, producing substantial and healthier plants.
Apart from that, Figure 4.0 shown the different effect of DO on plant fresh weight, height and number of leaves. In respect of plant fresh weight, samples harvested from oxygenated nutrient tank had greater weight, as well as the number of leaves was greater than the control samples. As to the average plant height, the control samples were slightly elongated and higher than the samples treated with high DO level. The stem elongation of control samples was likely correlated with high temperature. On account of the exposure to higher temperature, the occurrence of stem elongation in lettuce was facilitated, resulting in loose leaf structure which can be observed in the control samples (Iqbal, 2018). Therefore, temperature can inversely regulate the solubility of oxygen in water and indirectly affect the morphology of plant.
Conclusion:
To conclude, Lollo Rossa samples grown in oxygenated nutrient tank had significantly final root and shoot mass than the control samples. Over and above, the presence of DO has also proven to improve both plant growth development and characteristics with respect to fresh weight, height and leaf number. More importantly, DO is temperature-dependent and serves as a basic measurement to be taken in consideration for horticulture, optimizing both root and plant development. In the future, an extensive amount of research is required to intensify the understanding of the mechanism involving DO levels against both root and plant development.
References
Becker, K. (2016). Understanding dissolved oxygen. Retrieved from
https://www.growertalks.com/Article/?articleid=22058
Iqbal, Q. (2018). Effect of high temperature and exposure duration on stem elongation of iceberg lettuce. Pakistan Journal of Agricultural Sciences, 55, 95-101. doi:10.21162/PAKJAS/18.6554
Kubota, C. (2020). Chapter 13 - Growth, development, transpiration, and translocation as affected by abiotic environmental factors. In T. Kozai, G. Niu, & M. Takagaki (Eds.), Plant Factory (Second Edition) (pp. 207-220): Academic Press.
Suyantohadi, A., Kyoren, T., Hariadi, M., Purnomo, M. H., & Morimoto, T. (2010). Effect of high consentrated dissolved oxygen on the plant growth in a deep hydroponic culture under a low temperature. IFAC Proceedings Volumes, 43(26), 251-255. doi:https://doi.org/10.3182/20101206-3-JP-3009.00044
- Clara Pang (International University of Malaya-Wales)
![[Guide] Microgreens Comprehensive Growing Guide](http://cityfarm.my/cdn/shop/articles/4_1400x.jpg?v=1622550306)
[Guide] Microgreens Comprehensive Growing Guide
Microgreens Comprehensive Growing Guide
Including:
- Wheatgrass
- 13 types of microgreen
| Microgreen | Suggested Harvest (Day) |
| Sunflower | 7 |
| Corn | 7 |
| Wheatgrass | 10 |
| Wheatgrass | 10 |
| Arugula | 10 |
| Radish | 10 |
| Alfalfa | 12 |
| Wasabi Mustard | 12 |
| Pea | 14 |
| Red Amaranth | 15 |
| Parsley | 20 |
| Beet | 21 |
| Dill | 25 |
| Coriander |
28 |
Table 1 is the suggested harvesting day printed on the packaging.
Apparatus and materials required:
-Microgreens seeds, Sprouting tray, Peat moss, Spray bottle
Step 1: Methods of Growing
There are media and media-less method when growing microgreens. Among them, wheatgrass can be grown using both method; other microgreens are suggested to be grown through media. Peat moss is the most suitable media in growing microgreens.
- Media-less (Wheatgrass only) Wheatgrass seeds will have to be pre-soaked for 2 to 3 days prior growing. In this case, an air-tight container will be required for soaking. Put the desired amount of seeds into the container, fill in water and close the lid. Soak for 24 hours. Rinse every 8 hours thereafter and invert the container to dry it using a mesh. The seeds will be sprouted and ready to be grow in 36 to 48 hours.

Some photos show the media-less wheatgrass growing process
- Media: Peat Moss (Suitable for all kinds of Microgreens)
Peat moss are used in growing most kinds of microgreen. It is a great starting medium for seeds, it is able to hold several times its weight in moisture and releases it to the roots as needed. It also holds onto nutrients so that they do not rinse out when watering the plant or during a rain. Starting by putting a layer of peat moss on the sprouting tray.

Step 2: Sow the Seeds
After putting a layer of peat moss, even it, and sow the seeds. Make sure the seeds are not too close to each other because it will easily go moldy and causing poor ventilation in the later stage.

Step 3: Give it a Spray
Spray enough amount of water to the seeds, not too much, not too little. This is important as the second spray will only happen after the seeds have sprouted. Water should be enough to last until that stage.
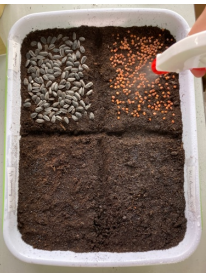
Spraying enough water before pressing the seeds.
Step 4: Give it some pressure
Cover it with a sheet of plastic and put something heavy on top. Plastic helps retain moisture, heavy weight helps to speed up the sprouting.

Plastic sheet and weight were being put on the seeds to retain moisture and force the sprouting.
Step 5: Remove the pressure and expose to light
The weight can be removed once it’s being lifted up by the seeds. It is a signal showing that the microgreens are ready for some light.

Sprouted seeds are ready for light. Without light exposure, they will start to elongate.
Step 6 (Last Step): Harvest!
After exposing to light, microgreens will be ready for harvest after 3 to 14 days depends on types and self-preference.

Microgreens of this sizes can be harvested.
Introduction and Growing Process:
1. Sunflower
Sunflower microgreen can be harvested during day 6 to 7.
2. Corn
Corn microgreen has shiny yellow colour and sweet taste. It is important to note that the entire growth of the corn microgreen must be in the dark condition. It will turn green as soon as meeting with light. Eating suggestion: salads, sandwiches, juice, smoothies.

3. Wheatgrass
Wheatgrass is relatively more popular amongst other microgreens. It can be drunk solely or mixed with juices. Suggested that drinking only the size of 3oz of wheatgrass shot rather than 8oz like the normal orange juice.

Wheatgrass can be harvested during Day 5.
4. White Leaf Amaranth
The seeds of white leaf amaranth are tiny so you will get a lot in a pack. It has a nutty flavour and contain 15% protein. Meanwhile, Amaranth has high germination rate and growing rate, it is one of the easy-growing microgreens.


White leaf Amaranth microgreen can be harvested from day 7 to day 9.
5. Arugula
Arugula microgreen is another easy growing microgreen and popular plant for chef. Its zesty and nutty flavour is best to spice up most dishes.

Arugula microgreen can be harvested during day 9 to 12
6. Radish
Radish microgreen is the easiest and fastest microgreen for beginners. It germinates quickly, grow fast, and easy to harvest. The size of the seed is perfect, the best choice for first-time growers to sow, raise and harvest. It is flavourful, crunchy, easy to be mixed with sauces, salads, sandwiches, and juices.

Radish microgreen can be harvested during day 6 to 8.
7. Alfalfa
Alfalfa microgreen has been a plant that grown for feeding livestock for hundreds of years. It is a part of the legume family and also considered to be a herb. One of the benefits is that the sprouts contain the same amount of nutrients and yet very low in calories, high in Vitamin K.

Alfalfa microgreen can be harvested during day 10 to 12.
8. Wasabi Mustard
Wasabi mustard microgreen has the peppery wasabi flavour which would not linger. It is one of the nicest and must grow microgreen that can be eaten with cuisines, sandwiches, salad, and dressing.


Wasabi Mustard microgreen can be harvested during day 7 to 8.
9. Pea
Pea microgreen also known as pea shoot; it has an exclusive texture which can’t find on other microgreens – tendril.

Pea microgreen can be harvested during day 10 to 12.
10. Red Amaranth
Red Amaranth microgreen is just like White Leaf Amaranth. The seeds are tiny. The stem is violet, the leaves are green. Amaranth is a very adaptive plant, it will survive under harsh environment, definitely an easy growing. It has high germination rate and growing rate.


Red Amaranth microgreen can be harvested during day 9 to 11.
11. Parsley
Parsley microgreen is a common herb used to garnish and season in many dishes across the globe. Seeds took longer to germinate, and it has lower germination rate compared to other microgreens.

Parsley microgreen can be harvested on day 15.
12. Beet
Beet microgreen has intensely purple stem and bright green leaves. Its colour is more shinny than the Red Amaranth microgreen. It is more nutrient-dense than the mature beet. The seed of the beet is easily confused with the seed of swiss chard.


Beet microgreen can be harvested on day 9 to 12.
13. Dill
Dill microgreen is best companion with fish, egg, and potato dishes. It delicious with citrusy note. Its feathery leaves and soft mouth feel make it decorative and perfect topping.

Dill microgreen can be harvested on day 15.
14. Coriander
Coriander microgreen has a distinguish fragrance and rich and complex flavour. This microgreen adds a perfect touch to dishes like curries, soups, sauces, and salads.

Coriander microgreen can be harvested on day 15.
Conclusion:
Each microgreen mentioned above can be harvested earlier than the suggested harvesting date. Some of listed were ready for harvest far earlier and some were close / almost aligned with the suggested harvesting days. It does not matter when to harvest your microgreen provided that harvesting early will preserve the tenderness and rich flavour of the microgreen. Harvesting late will sometimes causing loss or change in the desired flavour, also unwelcomed texture like trichomes that may sting both tongue and mouth. The original flavour and texture are well-retained if the microgreens were harvested before the true leaves emerge.
| Microgreens | Suggested Harvest (Day) | Actual Harvest (Day) |
| Sunflower | 7 | 7 |
| Corn | 7 | 5 |
| Wheatgrass | 10 | 5 |
| White Leaf Amaranth | 10 | 7 |
| Arugula | 10 | 9 |
| Radish | 10 | 6 |
| Alfalfa | 12 | 10 |
| Wasabi Mustard | 12 | 7 |
| Pea | 14 | 10 |
| Red Amaranth | 15 | 9 |
| Parsley | 20 | 15 |
| Beet | 21 | 9 |
| Dill | 25 | 15 |
| Coriander | 28 | 15 |
Table 2 showing the actual harvesting day based on this experiment.
This experiment was conducted under indoor condition.
One thing that worth noticing is that this experiment was conducted in an indoor environment. It is more consistent and predictable.
Mistakes that I learnt:
I failed a few times before successfully completing this experiment. It is worth sharing them from the beginning. It is important to prevent molding, which can be helped by doing the steps below. First, using a shallow container to grow. Second, use a container with holes will helps drain the excessive water. Third, sow the seeds with some distance, not too close to each other. Fourth, water it with just enough water, not too much, not too less. Spray water from above to prevent the seeds from washing away, water from beside when the leaves are big which block water from top.
To soak or not to:
Soaking seeds will accelerate the growing process, also, skinny seeds which would not germinate can be take out during the soaking process. It is suggested that only soaking the big seeds like sunflower, corn, pea, beet, and coriander. Soaking small seeds like dill, parsley, arugula, or alfalfa can be very hard to handle in the later stage. Note that seeds like sunflower will stay afloat when soaking, it is important to push down into the water.
Things to take note to:
- Root hairs, also known as absorbent hair, will sometimes be deemed as mold.
- Using coco mix to grow microgreens may cause residue on the leaves which might be troublesome to wash off later.
- Pressing the seeds into peat moss may help in the germination stage.
- Remove the weight as soon as possible to avoid elongate.
- Seed coat can be removed by hand easily in the later stage. Removing it too early may cause damage to the leaves.
Other usage of microgreens:
Other than making baby salad, microgreens can be used to garnish dishes. Mixing different types of microgreens will enhance the look and sometimes enrich the flavour of the dish. It can be done nicely with least effort because microgreen itself is beautiful.

- Goh Hao Yee (UTAR)
![[Research] Effects of Organic Matter on Plant Taste in NFT Hydroponics](http://cityfarm.my/cdn/shop/articles/11_1_1400x.png?v=1620387023)
[Research] Effects of Organic Matter on Plant Taste in NFT Hydroponics
Effects of Organic Matter on Plant Taste in NFT Hydroponics
Introduction
There are many factors contributing to flavor in vegetables such as plant biostimulants used, nutrient composition, growing temperature, harvest maturity and post-harvest handling (Diffley, 2012).
Organic matters such as humic acid and seaweed extract are among the most widely used plant biostimulants. A plant biostimulant is a substance or microorganism that, when applied to seeds, plants, or the rhizosphere, stimulates natural processes to enhance or benefit nutrient uptake, nutrient efficiency, tolerance to abiotic stresses, or crop quality and yield (Mattson & Shahid, 2021).
Plant biostimulants are available in different forms such as humic substances and seaweed extracts. The role of the plant stimulants is to enhance the plant growth and development and strengthen the plant’s defensive system to different environmental stresses (Mattson & Shahid, 2021). In this experiment, we mainly focus on the effects of plant biostimulant, Charbon (humic acid and seaweed extract) on plant taste.
Objective
The objective of this research project is to determine the effects of Charbon on plant taste.Materials
The materials of this research project include:
- City Vertical Farm M
- Green coral’s seedlings (one-months-old)
- 4 feet CityFarm Horticulture Full Spectrum LED T8 grow lights
- Cooling fans
- EC meter
- pH meter
- Measuring cups
- Weighing scale
- Hydroponic fertilizers (A and B)
- Charbon (humic acid and seaweed extract)
Method
This experiment was carried out in the City Vertical Farm M (M farm) that consisted of 2 pieces of 4ft NFT channels at both levels. Each NFT channel was occupied by eight green coral seedlings and supplied with two 4 feet grow lights. Each level of NFT channels was occupied with 16 samples. The lighting duration was set to 12 hours per day. Both levels were equipped with one cooling fan respectively.

Figure 1: One-month-old green coral’s seedlings in the channels.
The nutrient tank for the upper level of M farm consisted of both hydroponic fertilizers (A and B) and Charbon, whereas the nutrient tank for the bottom level was only consisted of hydroponic fertilizers (A and B) and are served as the experimental control pool. 35g of Charbon was added every two weeks. Furthermore, EC and pH reading were taken from both tank at the beginning and the ending of the experiment.
There are a total of 16 samples of green coral’s seedlings at each level of M farm. The samples were harvested on day 52 along with flavor testing. The respondents randomly picked and tested five out of the 32 green coral samples. The taste of each samples was rated accordingly to the scale of 1-sweet, 2-little sweet, 3-no taste, 4-little bitter and 5-bitter.
In addition, the initial weight and final weight and final appearance of each sample were illustrated in Table 2 and Table 3 respectively. Also, the initial reading and final reading from both the EC and pH meters were recorded in Table 4. The results were recorded on 29th March of 2021 which is a total of 52 days from the stage of germination to the stage of harvest.
Results
Flavor testing


Table 1 below showed the scores of flavor testing from 5 green coral samples of both Tank A and Tank B by 10 respondents.
Table 1: Flavor testing from samples of Tank A and Tank B
|
Tank A |
Tank B |
||||||||
|
17 |
15 |
17 |
17 |
14 |
17 |
15 |
20 |
16 |
19 |
|
16 |
15 |
17 |
12 |
15 |
16 |
16 |
22 |
16 |
24 |
|
Mean: 3.1 |
Mean: 3.62 |
||||||||
Table 2 below showed the initial weight and final weight of all 32 samples of green coral (with net pot) after 52 days.
Table 2: Initial weight and final weight of samples (with net pot).
|
Sample (S) |
Tank A |
Tank B |
||
|
Initial weight (g) |
Final weight (g) |
Initial weight (g) |
Final weight (g) |
|
|
1 |
16 |
58 |
16 |
88 |
|
2 |
17 |
165 |
17 |
121 |
|
3 |
15 |
116 |
15 |
144 |
|
4 |
16 |
113 |
17 |
163 |
|
5 |
16 |
116 |
16 |
134 |
|
6 |
15 |
134 |
16 |
153 |
|
7 |
16 |
111 |
15 |
93 |
|
8 |
15 |
63 |
15 |
93 |
|
9 |
16 |
49 |
16 |
69 |
|
10 |
16 |
96 |
15 |
122 |
|
11 |
16 |
120 |
16 |
161 |
|
12 |
16 |
140 |
15 |
127 |
|
13 |
16 |
98 |
16 |
141 |
|
14 |
16 |
120 |
16 |
142 |
|
15 |
16 |
95 |
16 |
130 |
|
16 |
15 |
63 |
14 |
57 |
|
Average weight (g) |
16 |
104 |
16 |
121 |
Table 3 below showed the final appearance of all 32 samples of green coral after harvested.
Table 3: Final appearance of green coral samples after harvested.
|
Samples from Tank A |
Observation |
Samples from Tank B |
Observation |
 |
Sample 1, 8, 9, 10, 16 - Elongated, slightly twisted and low number of leaves. |
 |
Sample 1, 8, 9,10, 16 - Elongated, and low number of leaves. |
 |
Sample 5, 6 - Elongated and twisted. |

|
Sample 2, 3, 5, 7- Elongated and slightly twisted. |
 |
Sample 2, 3, 4, 7, 11, 12, 13 ,14, 15- Good in shape, compact and not twisted. |
 |
Sample 4, 6, 11, 12, 13, 14, 15 - Compact and slightly twisted. |
Table 4 below showed the initial reading and final reading from both the EC and pH meters in both tank A and tank B.
Table 4: Initial reading and final reading from both the EC and pH meters.
|
Tank A |
Tank B |
|||
|
EC (ms/cm) |
pH |
EC (ms/cm) |
pH |
|
|
Initial reading |
1.67 |
6.39 |
1.58 |
6.25 |
|
Final reading |
2.50 |
7.30 |
2.10 |
7.30 |
Discussion
Plant taste
According to the results obtained, most of the respondents rated the taste of the samples from Tank A and Tank B as no taste and little bitter respectively. Tank A consisted of both hydroponic fertilizers (A and B) and Charbon, whereas Tank B only consisted of hydroponic fertilizers (A and B). Charbon was made up of humate and seaweed extracts.
In terms of plant taste, sulfur is important in contributing to the flavor of the crops produced. Next, humate consisted of potassium. Potassium also proven have a crucial role in product quality parameter such as taste (Çalişkan & Cengiz Çalişkan, 2017). However, at the same time, humate also had the probability to decrease the amount of sulfur available to the plants (Rauscher, n.d.). Hence, if sulfur was unable to deliver to plant, this may results in no taste. Lastly, the reason of causing no taste in samples might be due to the humic acid in Charbon was chelated with the calcium in hydroponic fertilizers and resulted in precipitation. This makes the plants cannot absorb the nutrient such as potassium from humate.
Weight and final appearance of green coral samples
Results demonstrated that the samples with the addition of Charbon had a lighter weight as compared to the control. The average size of samples from Tank B was 104g which is 17g lesser than the samples from Tank A. Furthermore, result also showed that most of the samples from Tank A were good in shape, compact and not twisted whereas the samples from Tank B were compact and slightly twisted. This proved that the organic matter which is seaweed extracts in Charbon could lead to improved plant growth and quality.
EC reading and pH reading
EC stands for electrical conductivity. An EC meter measures the molar conductivity which is the potential for an electrical current to be transported through water (Klaassen, n.d.). Electrons are able to flow through the water due to the ions dissolved in the water (Klaassen, n.d.). The addition of the Charbon resulted in higher EC reading compared to the tank without Charbon. Hence, when Charbon was dissolved, the molar conductive potential for current through water was increased and thus increased the EC value.
Moreover, pH of a solution indicates the concentration of free hydrogen ions it contains (Andrew, n.d.). pH is related to nutrient availability (Andrew, n.d.). When the pH is within the optimum range, more nutrient was delivered and available to the plant roots. The result showed that the addition of the Charbon showed higher pH reading compared to the tank without Charbon. Hence, the tank consisted of Charbon had higher nutrient availability and this helped the plant to improve the nutrient uptake. However, when the pH of the nutrient solution was above 7, Ca2+, Fe2+, Mn2+, and Mg2+ would precipitate to the salts (Çalişkan & Cengiz Çalişkan, 2017). This means that the nutrients received by plants are restricted.
Conclusion
From this experiment, the results showed that the taste of the samples from Tank A and Tank B as no taste and little bitter respectively. Furthermore, the samples from Tank B are heavier than samples from Tank A. However, in terms of appearance, samples from Tank A with addition of Charbon have better appearance as compared to the control. This experiment is required to repeat for several times to obtain accurate results. Further studies need to be done on the effects of Charbon on plant taste in NFT hydroponics to support the hypothesis of this experiment.
References
Andrew. (n.d.). What is the best pH for hydroponics? Link
Çalişkan, B, & Cengiz Çalişkan, A. (2017). Potassium nutrition in plants and its interactions with other nutrients in hydroponic culture. Link
Diffley, A. (2012). Flavor – Growing vegetables. Link
Klaassen, P. (n.d.). Electrical conductivity, why it matters. Link
Mattson, N., & Shahid, M. (2021). Plant biostimulants as a tool for hydroponic vegetable production. e-Gro. 6(7), 1-7.
Rauscher, F. (n.d.). Which nutrients contribute to better-tasting homegrown fruits and vegetables? Link
- Goh Yar Yean (INTI International University)
![[Research] Effects of Airflow on Butterhead Lettuce](http://cityfarm.my/cdn/shop/articles/Open_Sans_Extra_Bold_32_2_1400x.png?v=1609230092)
[Research] Effects of Airflow on Butterhead Lettuce
Effects of Airflow on Butterhead Lettuce
Objectives
- To observe the effects of airflow on the butterhead lettuce.
- Determine the optimum airflow for butterhead lettuce
Introduction
The relationship between air and plants is very influential because they require carbon dioxide from the air to photosynthesize (produce food). Air movement also promotes transpiration in plants, it is a natural process in which the water travels through the plants and returns to the air. The two main functions are to decrease the temperature of the plants and deliver minerals to every part of the plants for photosynthesis (Brawner, n.d.). This is crucial to indoor farming because an enclosed space is not able to deliver natural adequate ventilation to the plants. In this case, indoor-grown butterhead lettuce usually experiences tip-burn on the inner leaves. Tip-burn is the result of deficiency of calcium, the development of necrosis on the young emerging leaves. This experiment was made to observe the effects of airflow on the butterhead lettuce and determine the volume of airflow to prevent the lettuce from getting tip-burn.
Materials
- City Vertical Farm M
- Butterhead lettuce seedlings ( 3 weeks old)
- 4ft LED T8 growlights
- Hydroponic fertilizers A and B
- pH down phosphoric acid
- Cooling fans
- Acrylic and plywood sheets
- Temperature and humidity meter
Method
This experiment was built based on the City Vertical Farm M, the 4ft NFT channels were isolated from each other using acrylic sheets to make four separated tunnels. Each tunnel was occupied with seven butterhead lettuce samples and supplied with two 4ft CityFarm Horticulture Full Spectrum LED T8 grow lights, the distance between the grow lights and the channels are 20 cm. The lighting duration was set to 12 hours in a day.


Figure 1. Photos of the modified system.
The tunnels were equipped with no fan, one fan, two fans, and three fans respectively, placing right below the grow lights at the beginning of the NFT channels. The cooling fan (12V) is 8cm long and 8cm wide, delivering 43 cubic feet per minute (CFM) or 1.22m3/ min. The fans were operating continuously for 28 days. The nutrient concentration was kept between the range of 1.3~ 1.5 mS/cm, under a pH of 6.0 ~ 6.9.

Results
Table 1: The average temperature and humidity of the four different channels.
|
|
Channel 1 |
Channel 2 |
Channel 3 |
Channel 4 |
|
Temperature (˚C) |
25.2 |
25.0 |
25.0 |
24.7 |
|
Humidity (%) |
55.6 |
54.8 |
55.5 |
56.1 |
Note. The temperature and humidity were recorded daily at 6 pm.
Table 2. The presence of tip-burn was observed during the experiment.
|
|
Sample 1 |
Sample 2 |
Sample 3 |
Sample 4 |
Sample 5 |
Sample 6 |
Sample 7 |
|
Channel 1 |
√ |
√ |
√ |
√ |
√ |
√ |
√ |
|
Channel 2 |
- |
√ |
- |
- |
- |
- |
√ |
|
Channel 3 |
- |
- |
- |
- |
- |
- |
- |
|
Channel 4 |
- |
- |
- |
- |
- |
- |
- |
Note. “√” indicates the presence of tip-burn on the butterhead lettuce samples; “-” indicates no presence of tip-burn observed. The cooling fans were located 7 inches from the first samples (sample 1), delivering air from the left (Sample 1) to the right (Sample 7).
Table 3. Weight of the Butterhead lettuce samples.
|
|
Sample 1 |
Sample 2 |
Sample 3 |
Sample 4 |
Sample 5 |
Sample 6 |
Sample 7 |
|
Channel 1 |
149g |
194g |
180g |
164g |
165g |
132g |
113g |
|
Channel 2 |
163g |
164g |
151g |
187g |
171g |
130g |
119g |
|
Channel 3 |
161g |
147g |
183g |
149g |
156g |
160g |
133g |
|
Channel 4 |
146g |
153g |
166g |
149g |
127g |
150g |
122g |
Note. The weight of the samples included the net pots and water content in the sponge.

Figure 3. Butterhead lettuce samples from Channel 1 (No fan)

Figure 4. Butterhead lettuce samples from Channel 2 (1 fan)

Figure 5. Butterhead lettuce samples from Channel 3 (2 fans).

Figure 6. Butterhead lettuce samples from Channel 4 (3 fans).
Discussion

The results were recorded on 17/11/2020. All of the samples in Channel 1 (C1) experienced tip-burn. Two out of the seven samples were experiencing tip-burn on Channel 2 (C2). There was no tip-burn observed from the samples of Channels 3 (C3) and 4 (C4). From the observations, the cooling fans were able to reduce the temperature and increase the humidity around the channels. Channels with the cooling fans (C2, C3, and C4) had slightly lower temperatures and higher humidity than the channel without any cooling fan (C1). However, the difference was not significant, the maximum difference is 0.5˚C and 1.3% of humidity. Hypothetically, the temperature decreases as the number of fans increases; the humidity percentage is directly proportional to the number of fans. But C3 with two fans had the same temperature as C2 with only one fan; C2 had lower humidity than C1 with no fans which did not match the hypothesis. The positions of the temperature and humidity meters in the channels or the defects of devices led to inaccurate readings.
Table 4. The Air Volume Flow of 4 different channels
|
Channels |
1 (No fan) |
2 ( 1 fan) |
3 ( Two fans) |
4 ( Three fans) |
|
Air volume flow rate in cubic feet per minute (CFM) |
0 CFM |
43 CFM |
86 CFM |
129 CFM |
Tip-burn on the butterhead lettuce sample is a sign of calcium deficiency, calcium is one of the minerals which deliver the top of the plants via the transpiration flow. The transpiration rate is affected by temperature and evapotranspiration (ET). The butterhead lettuce tends to undergo head formation in the center, where the head develops from the outer leaves to the inner leaves. The inner leaves had a lower transpiration rate than the outer leaves because they had limited access to the open air, which led to a deficiency in calcium, thus tip-burn occurred. The observations showed that high CFM of airflow in the channels increased the transpiration rate, so tip-burn was prevented. Further studies are required because the increased transpiration rate was assumed, and there were no results recorded on the transpiration rate. One cooling fan onwards, meaning 43 CFM or more than that greatly reduced the occurrence of tip-burn on the samples.
The air volume flow did not have a significant impact on the weight of the butterhead lettuce. However, all of the 7th samples which were located at the end of the channels were not able to form heads. The assumptions were the samples did not obtain sufficient light from the system or the samples did not obtain sufficient airflow from the beginning of the channels, causing the temperature to increase around the head forming center.


Figure 8. The Butterhead lettuce samples in the end of Channels 1 and 2. The samples failed head formation and slight tip-burn occurred.
Apart from that, the butterhead lettuce samples in channels with 2 fans (86 CFM) and 3 fans ( 129 CFM) had stunted growth during the first two weeks of the experiment. The samples’ height was maintained right below the cooling fans during that period, this might due to the overpowering airflow stressing the young samples. The samples from the channels with 1 fan ( 43 CFM) or without any fan did not experience any stunted growth.
Conclusion
From this experiment, the results showed that 43 CFM and above of airflow could reduce the occurrence of tip-burn on the butterhead lettuce. The temperature was reduced and the humidity was increased as the volume of airflow increases. This experiment is required to repeat for several times to obtain accurate results, further studies or experiments need to be done on the effects of airflow on the transpiration rate of the plants to support the hypothesis of this experiment. The cooling fans were operating for 28 days, I suggest to experiment regarding the duration of delivering optimum airflow to the plants in a day, which is important to commercial farms when it comes to electricity saving and efficiency.
References
Brawner, M., n.d. Transpiration And Why It Matters. [online] Harlequinsgardens.com. Available at: <https://harlequinsgardens.com/transpiration-and-why-it-matters/> [Accessed 20 December 2020].
- Jeffrey Chan
![[Research]Grow Light Experiment with Lollo Bionda](http://cityfarm.my/cdn/shop/articles/Open_Sans_Extra_Bold_32_1_1400x.png?v=1577970855)
[Research]Grow Light Experiment with Lollo Bionda
HORTICULTURE GROW LIGHT EXPERIMENT
I was assigned to conduct a light experiment for salad plants to observe and figure out the lights with best performance towards plant in terms of plant’s weight, height, number of leaves and appearance. There are 5 types of artificial lights will be used in this experiment.
The model of hydroponic farm system used is the Zig-zag Vertical Farm, there are 6 NFT channels in total, I am using only five of them. To ensure that the lights do not interfere with each other, the middle space is covered with polystyrene boards. The plants used in this experiment are Lollo Bionda, one type of coral salad. The seeds are germinated in sponge before used and been transplanted into the Zig-zag Vertical Farm at the age of 2 weeks old, they are germinated and transplanted at the exact same time to ensure the reliability of this experiment.
Aims:
- To figure out the best lights for plant growth out of the five lights been experimented.
- ‘different light wavelength’ and ‘light intensity’
Materials and methods:
- Lollo Bionda plantlets (2 weeks old, sponge as media),
- Zig-zag Vertical Farm,
- 5 types of lights,
- Hydroponic fertilizer as nutrients supply (been maintained within 600 to 700ppm throughout the experiment)

Figure 4: Zig-zag Vertical Farm (model of hydroponic system been used in this experiment)
Table 1: Information of lights in the experiment.
|
Light 1: Power:22W PPF: 35 μMol/s PPFD at 22cm: 95 μmol/m2/s LED quantity: 73pcs Length:1200mm LED: Purple |
Light 2: Power:18W PPF: - PPFD at 22cm: 70 μmol/m2/s LED quantity: 120pcs Length:1200mm LED: Red and Blue |
Light 3: Power:18W PPF: - PPFD at 22cm: 110 μmol/m2/s LED quantity: 96pcs Length:1200mm LED: Full Spectrum |
|
Light 4: Power:18W PPF: 32.4μMol/s PPFD at 22cm: 107 μmol/m2/s LED quantity: 120pcs Length:1200mm LED: Purple |
Light 5: Power:30W PPF: 66μMol/s PPFD at 22cm: 210 μmol/m2/s LED quantity: 175pcs Length:1100mm LED: Full spectrum |
|
RESULT
Week 1 - Data of light experiment.
Table 1: Wet weight of the plants, which weight of net pot is not included. (weight of net pot = 2.4g). The weighing machine was calibrated before used to remove the weight of net pot.
|
Lights |
Plant’s wet weight (g) |
Total weight gain (Week 5 – Week 1) |
||||
|
Week 1 |
Week 2 |
Week 3 |
Week 4 |
Week 5 |
||
|
1 |
8.67 |
10.52 |
15.95 |
27.95 |
47.00 |
38.33 |
|
2 |
9.93 |
12.30 |
18.40 |
33.50 |
59.22 |
49.29 |
|
3 |
8.33 |
10.00 |
15.63 |
29.90 |
58.68 |
50.35 |
|
4 |
8.27 |
10.98 |
17.87 |
34.65 |
63.02 |
54.75 |
|
5 |
7.90 |
11.53 |
25.07 |
59.05 |
115.37 |
107.47 |
Table 2: Height of the plant, only parts above the germination sponge are measured.
|
Lights |
Plant’s height (cm) |
Total height gain (Week 5 – Week 1) |
||||
|
Week 1 |
Week 2 |
Week 3 |
Week 4 |
Week 5 |
||
|
1 |
7.55 |
10.80 |
14.92 |
19.12 |
23.30 |
15.75 |
|
2 |
7.70 |
9.62 |
13.95 |
18.73 |
23.15 |
15.45 |
|
3 |
7.05 |
9.60 |
13.00 |
17.02 |
21.17 |
14.12 |
|
4 |
7.97 |
10.18 |
13.92 |
18.90 |
23.85 |
15.88 |
|
5 |
7.78 |
8.88 |
12.75 |
17.42 |
20.43 |
12.65 |
Table 3: Number of leaves.
|
Lights |
Number of Leaves |
Total leaves gain (Week 5 – Week 1) |
||||
|
Week 1 |
Week 2 |
Week 3 |
Week 4 |
Week 5 |
||
|
1 |
5.12 |
7.3 |
8.67 |
10.33 |
14.83 |
9.71 |
|
2 |
5.00 |
6.83 |
9.50 |
10.50 |
14.17 |
9.17 |
|
3 |
5.00 |
6.83 |
9.50 |
10.50 |
14.83 |
9.83 |
|
4 |
5.00 |
6.83 |
9.83 |
10.67 |
15.00 |
10 |
|
5 |
5.00 |
7.17 |
9.17 |
11.83 |
18.33 |
13.33 |

Overall observation of plants’ appearance:
Light 1- Lengthy stems, slim leaves with scattering pattern.
Light 2- Lengthy stems, leaves broader than plants under light 1, scattering leaves.
Light 3- Lengthy stems, slim leaves with scattering pattern, similar appearance with plants under light 2.
Light 4- Lengthy stems, slim leaves with scattering pattern, heavier wet weight compared to row 1,2 and 3.
Light 5- Broad leaves, bushy, with heaviest weight and has highest amount of leaves compared
to plants under other lights.
Weight comparison:
Figure 15: weight comparison graph for plants under different lights over 5 weeks.

Height comparison:
Figure 16: height comparison graph for plants under different lights over 5 weeks.

Number of leaves comparison:

Figure 17: number of leaves comparison graph for plants under different lights over 5 week
Table 17: General view on the Lollo Bionda in the experiment under different lights.

DISCUSSION
Plants under light 5 has the most satisfying output which has heaviest weight, moderate height and highest number of leaves compared to others. Light 5 illustrate the best performances among the lights been tested, which suggested that full spectrum light might be more suitable in supporting overall plant growth.
Light 3 which is full spectrum as well do not perform the same as light 5 might because of the strength of power.
Plants under light 1, 2 and 4 (purple or red and blue lights) shows a similar symptom which is elongated stem, this might due to the effect of red light, which support stem elongation process or low intensity of light due to low power output of the lights. Besides, a high relative content of blue light could reduce the plant leaf area, this explained the slim leaves appearances in the plants under light 1,2 and 4. These observations suggested that red and blue light has moderate or undesirable effects on lettuce growth such as elongated stem and slim leaves.
Suggestions or recommendation:
- Use lights with same power output to eliminate the effect brings by other factor such as light intensity.
- Carry out this experiment in dark environment which do not get affected by other light sources.
CONCLUSION
Full spectrum light is suggested to be the most suitable light source for plant growth based on the performance on plant’s weight, height and appearance. Light 3 and 5 are both full spectrum the differences showed in their performance might due to the difference in power output.
- Xin Wei Lee
![[Article] Get to know your lettuce!](http://cityfarm.my/cdn/shop/articles/11_12_300x.png?v=1635577087)
![[Research] Effects of Dissolved Oxygen (DO) on the Growth of Lollo Rossa in NFT Hydroponic System](http://cityfarm.my/cdn/shop/articles/11_300x.png?v=1625561065)
![[Guide] Microgreens Comprehensive Growing Guide](http://cityfarm.my/cdn/shop/articles/4_300x.jpg?v=1622550306)
![[Research] Effects of Organic Matter on Plant Taste in NFT Hydroponics](http://cityfarm.my/cdn/shop/articles/11_1_300x.png?v=1620387023)
![[Research] Effects of Airflow on Butterhead Lettuce](http://cityfarm.my/cdn/shop/articles/Open_Sans_Extra_Bold_32_2_300x.png?v=1609230092)
![[Research]Grow Light Experiment with Lollo Bionda](http://cityfarm.my/cdn/shop/articles/Open_Sans_Extra_Bold_32_1_300x.png?v=1577970855)